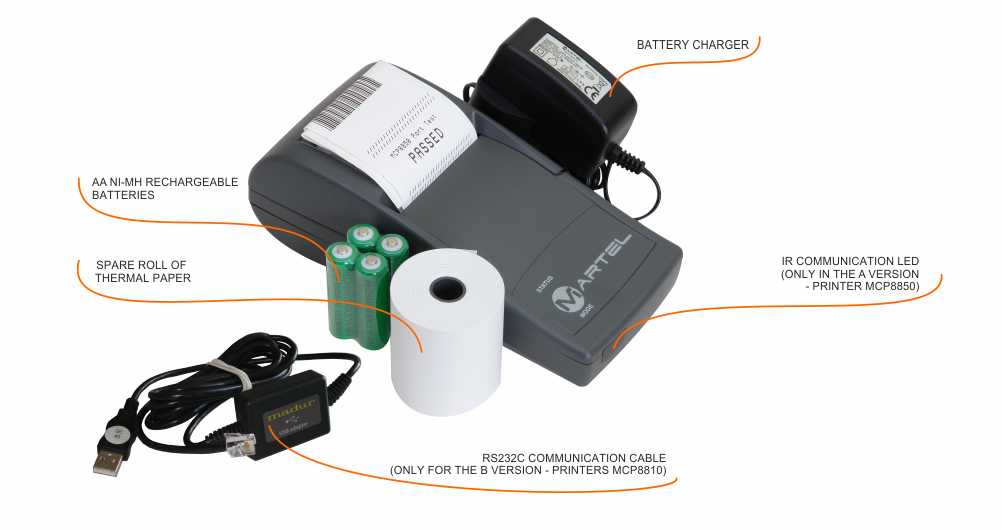
Almost all madur analysers have possibility to print report from measurement session right on the on the spot. Large portable analysers have a built-in Epson M190 printer. Small portable analysers (Sensonic 1400) can be optionally equipped with a portable printer - Martel MCP8850 with HP wireless communication interface. Reports from measurement session in Sensonic IR-1 gas analyser can be prepared as PNG file and printed on commercial printer, or Sensonic IR-1 can be equipped with portable printer - Martel MCP8810 with RS-232C communication protocol.
Features
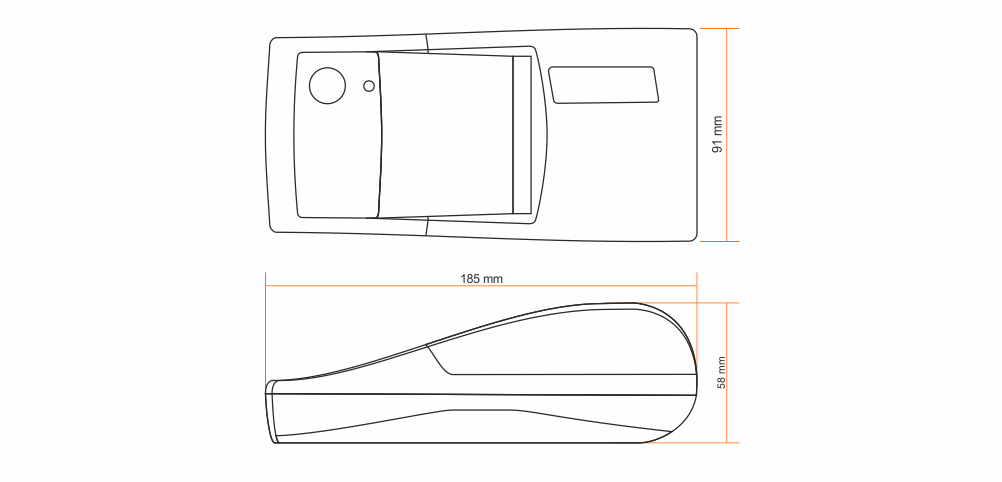
- Light in weight (425g with paper and batteries), small in dimensions (91mm x 185mm x 58mm) Martel printer is very handy to use.
- Uses 58mm thermal paper / printing width 48mm.
- Dot matrix mechanizm allows to print fonts as well as graphics.
- Printing speed up to 10 lines per second.
- Supplied with 4xAA NiMH batteries. Fully charged batteries allows to print up to 6000 lines.
- Sensonic 1400 use MCP8850 with Infra-red HP wireless interface
- Sensonic IR-1 uses MCP8810 with RS-232C communication interface (connected with Sensonic IR-1 via RS-232C ↔ USB adapter)

Tech specs
General parameters: Version A (MCP8850 printer with HP-IR interface)
| Printer type | Martel 8800 series |
| Dimensions (W x H x D) | 91 x 185 x 58mm |
| Weight (without batteries) | 425g |
| Batteries: type | size | quantity | Rechargable Ni-MH (1.2V) | AA | 4 |
| Operating temperature range | 0 ÷ 50°C |
| Storage temperature range | -20 ÷ 60°C |
| Interface | Infrared interface, 82240B format |
| Paper: type | width | max roll diameter | Thermal | 58mm | 50mm |
| Printing system | Thermal line head system |
| Dot pitch: horizontal | vertical | 0.125mm | 0.125mm |
| Printing width | 48mm (384 dots) |
| Printing speed | 10 lines per second (max) |
| Charging time | charge life | 4 hours (16 hours if charged during work) | about 6000 lines |
General parameters: Version A (MCP8850 printer with RS232C interface)
| Interface | RS232C interface |
Drawing
Drawing #1
Portable printer - dimensions
Way to use
MCP8850 with Sensonic 1400 analyser
In order to print a report from Sensonic 1400 measurements:
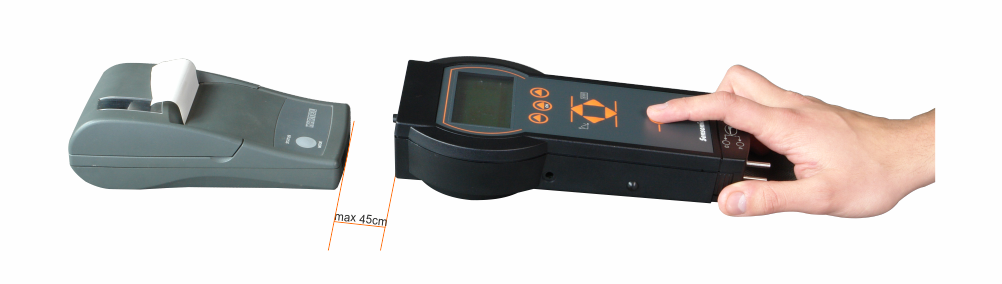
- Turn on the printer (by pressing Mode button)
- Select the screen you wish to print on your sensonic analyser
- Place the analyser and the printer facing each other (the way it is presented in the picture below) not further than 45cm apart
- Press the instant print button on the sensonic analyser.
MCP8810 Printer with Sensonic IR-1 analyser
In order to print a report from Sensonic IR-1:
- Connect the printer with Sensonic IR-1 analyser using included RS-232-USB adapter
- Turn on the printer (by pressing the grey MODE button for 3 seconds)
- In Photon go to “Printouts” menu, select interesting report and press “Print” button on the analyser’s screen.
Battery charging
When printing becomes fade, erratic or impossible it means the batteries in printer become exhausted (printer will indicate the low power status by flashing with its diode 3 times repeatedly during printing).
There are two modes the batteries can be recharged:
There are two modes the batteries can be recharged:
- Trickle mode - charging lasts 16 hours. To charge in this mode, connect the mains adapter when the printer is off.
- Fast mode - charging lasts 4hours. To charge in this mode, connect the mains adapter when the printer is on.
Warning: Please remember to check the label on your printer before use, to make sure you will not mix it with any other!
Signalistaion of printer's errors, warnings and operation modes
Printer indicates its status, warnings and errors with its LED diode. Here are some statuses, and errors and their LED signs:


- Paper out; When the printer is running out of paper the LED indicator blinks repeatedly.
- Batteries are nearly exhausted; Indicator flashes 3 times repeatedly.
- Fast charging; When printer is charging in the fast mode it flashes every 1 second.
- Head thermal limit; In case of extensive printing the temperature of print head may be dangerously high and then the printer must cool down. Status indicator flashes twice repeatedly
Power on self test
If in doubt, the printer is not working correctly, one can perform printer’s self test:

- Turn the printer off
- Press and hold the Mode button for 2 seconds
- Release the Mode button
- Printer will power on and perform self-test
The correct self-test printout should look like in the presented pictures:
Replacing paper roll
Finished roll of paper is indicated with repeatedly flashing LED diode.
To replace the paper:
To replace the paper:
- Open the paper cover and remove the residue of paper by pressing Mode button (do not pull the paper from the mechanism)
- Reel off few centimeters from a new roll
- Check if the edge is straight and, if necessary, cut it straight
- Slide the leading edge of the paper through the paper entry slot, with the leading edge of the paper feeding forwards from the bottom of the roll, until you feel resistance
- Press the Mode button and feed the paper through the printer mechanism. Keep the Mode button depressed until enough paper is fed through the printer mechanism to pass through the paper exit slot
- Close the paper cover lid